Commercial interior design is a business project. It affects daily work, customer experience, staff movement, safety, maintenance, and long-term costs. That is why a commercial interior cannot be treated like a quick décor upgrade.
A reliable commercial interior process follows a clear sequence. Each step reduces risk. Each step removes guesswork. Each step makes the cost and timeline more predictable.
When teams skip steps, projects usually suffer in the same ways:
- The layout looks fine on paper, but fails in daily use
- The electrical, data, and air planning do not match the final seating or zones
- Material choices look good at handover, but wear out early
- Work gets delayed because decisions and approvals happen late
- The scope becomes unclear, and then the budget changes without control.
This guide explains the commercial interior design process in practical terms. It covers what happens at each stage, what should be decided, and what should be checked before moving forward.
Step 1: Project brief and business requirements
This is the foundation. If the brief is unclear, the entire project becomes unstable.
A good brief is not a single paragraph like “modern office” or “premium showroom.” It needs clear answers about how the space will be used.
What gets defined in the brief
1) Space type and use
- Office interior design (corporate interiors)
- Retail interior design (store or showroom)
- Hospitality interiors (restaurant, café, lounge)
- Healthcare interiors (clinic, consultation, treatment)
- Mixed-use commercial interiors (two or more functions)
2) Users and volume
- Number of staff using the space daily
- Number of visitors/customers expected in peak hours
- Public areas vs staff-only areas
- Seating count requirements if needed
3) Daily operations
- How people move through the space
- Where staff need privacy and where they need open interaction
- What teams sit near each other and why
- Where storage is needed and what kind
- What tasks happen often (meetings, calls, product handling, patient flow)
4) Brand and tone
This is not about fancy design talk. It is about practical identity.
- Should the space feel formal or relaxed?
- Should it feel quiet or active?
- Should it be focused on display and visibility, or focused on work and comfort?
- What first impression should the entry create?
5) Timeline reality
- When the business needs the space ready
- Whether the business will operate during work or the space is empty
- Building working hours and restrictions (if applicable)
6) Budget range
A budget range is needed early to keep decisions realistic. Without it, the concept can drift into options that cannot be built without cuts later.
Output of Step 1
- Requirement notes
- Space type and zone list
- Headcount and usage assumptions
- Budget range and timeline targets
This step prevents a common issue: design starts before anyone agrees on what the space must do.
Step 2: Site survey and base information
Commercial interiors are not designed in a vacuum. The space and building conditions decide what is possible.
A site survey checks the basics and captures the real constraints.
What the site survey reviews
1) Measurements and layout conditions
- Area, shape, and structural grid
- Column positions and beams
- Ceiling height and slab levels
- Window locations and daylight areas
- Entry points, core access, and lift routes
2) Building services
- Existing electrical load and panel locations
- Existing air conditioning type and distribution points
- Plumbing points and drainage access
- Fire safety systems locations (where visible)
- Any restrictions on cutting or shifting building elements
3) Site restrictions
- Work hours allowed
- Material movement rules
- Noise limits
- Approval rules for changes
- Parking and loading constraints
Why this step matters
If the team skips survey clarity, the design may assume:
- A wall can move when it cannot
- An air duct can shift when it cannot
- A pantry can sit anywhere when plumbing cannot reach
- A meeting room can fit where the headroom is low
These mistakes cost time later.
Output of Step 2
- Measured site plan or verified base plan
- Notes on constraints
- A clear list of what can and cannot be changed
Step 3: Space planning and zoning (layout options)
This is where planning begins. The goal is not “beauty.” The goal is function.
A commercial interior layout should answer:
- Where each function sits
- How people move
- How privacy is controlled
- How service zones support operations
What space planning includes
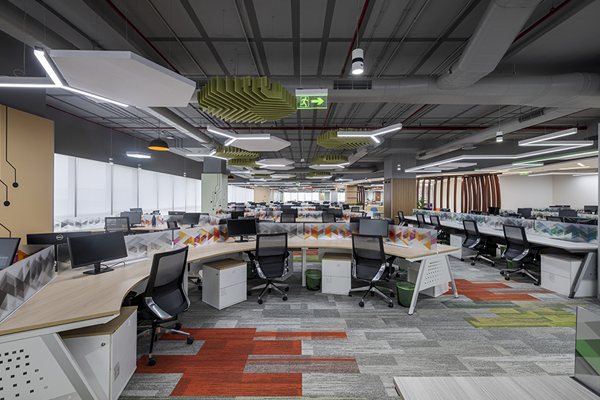
1) Zone mapping
Typical zones include:
- Reception and waiting
- Workstations and team seating
- Meeting rooms (small and large)
- Cabins or private rooms (if needed)
- Pantry, dining, breakout
- Storage, printing, utility
- Back-of-house staff areas
- Display zones (retail/showroom)
- Consultation and treatment rooms (healthcare)
2) Circulation and movement
Movement should be logical:
- Visitors should not cross staff-only work zones
- Staff should reach key rooms without walking through public areas
- Storage should be reachable without blocking customer paths
- Service paths should not cut through seating in busy zones
3) Adjacency planning
Which zones need to be near each other?
- Meeting rooms near the entry for client movement
- Pantry away from quiet work zones
- Storage near the function that uses it daily
- High noise zones are separated from high focus zones
4) Capacity planning
This includes:
- Seating count that fits circulation rules
- Room sizes that fit real furniture
- Waiting areas that do not spill into walk paths
Why multiple layout options help
Most projects benefit from 2–3 layout options early. Not because the team is confused, but because different layouts show different trade-offs:
- More seats vs more meeting rooms
- More openness vs more privacy
- Better entry presence vs more usable back area
Output of Step 3
- Layout options with zoning
- A selected final layout direction
- Notes on what the layout is solving (privacy, flow, capacity)
Step 4: Concept design (look, feel, and practical direction)
Once the layout is approved, the design direction is defined.
Concept design sets the baseline for:
- Material choices
- Ceiling style approach
- Lighting intent
- Furniture direction
- Color approach
This stage must stay practical. A concept that looks good but cannot be maintained creates regret later.
What a good concept includes
1) Material direction
- Flooring zones (work, entry, public, wet areas)
- Wall finish approach (paint, panels, texture where useful)
- Ceiling approach (open, false ceiling, mixed)
- Surface durability planning for high-use areas
2) Lighting intent
- Task lighting where work happens
- Soft general lighting where people move
- Highlight lighting for displays or feature zones if needed
- A plan for glare control and comfort
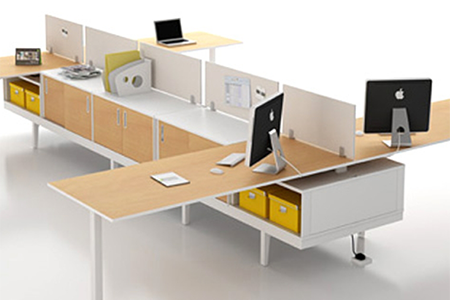
3) Furniture intent
- Workstation style direction
- Meeting room furniture size assumptions
- Storage and joinery approach
- Seating comfort level for visitors
4) Brand presence
This is not about loud branding. It is about consistency:
- Entry experience
- Materials that match the business tone
- Color use that does not create fatigue
- A simple identity thread across the space
Output of Step 4
- Concept direction summary
- Early material and lighting direction
- A clear approval checkpoint before detailed work begins
Step 5: Detailed design and working drawings
This is where commercial interiors either become controlled or chaotic.
A detailed set of drawings reduces the need for assumptions. It tells the execution team what to build, where, and how.
What working drawings typically cover
1) General arrangement drawings
- Final layout with dimensions
- Partition plans
- Door schedules and openings
2) Ceiling plan
- Ceiling levels and types
- Lighting positions
- Air distribution points
- Detectors and sprinkler coordination were needed
3) Electrical plan
- Power points
- Switches and circuits
- DB connections (as per site planning)
- Lighting wiring planning
4) Data and network planning
- Data points were needed
- Network cabinet location planning (if required)
- Wi-Fi planning considerations (based on layout zones)
5) Furniture and joinery drawings
- Workstations and storage units
- Reception desk
- Pantry units
- Display units for retail/showrooms
- Any built-in seating or partitions
6) Finish schedule
- Flooring materials by zone
- Wall finishes by zone
- Ceiling finish notes
- Hardware and fitting notes were needed
Coordination checks that must happen here
Commercial interiors fail when systems are not aligned.
Examples of coordination issues:
- Light falls directly above a partition line, then pthe lacement looks wrong
- Air diffuser ends up above a cabinet, and airflow becomes poor
- Data points are missing in meeting rooms
- Door swings clash with furniture placement
- A ceiling element blocks access for maintenance
This stage should include active coordination checks before execution starts.
Output of Step 5
- Final drawings for execution
- Final specifications
- A stable base for costing and planning
Step 6: Scope definition and cost estimation
Once drawings are ready, pricing becomes far more accurate.
A strong scope is not a vague line like “complete office interior.” It should list work categories clearly.
What scope definition covers
1) Civil and partitions
- Partition type and extent
- Wall finishes and paint
- Any leveling or repair work
2) Flooring
- Material type by zone
- Skirting and transition details
- Installation method notes, if needed
3) Ceiling
- Ceiling type and areas
- Access panel planning
- Integration with lights and air points
4) Electrical and lighting
- Wiring, points, boards (as per project)
- Fixtures and fitting scope
- Testing notes
5) HVAC distribution work
This depends on what exists and what needs to change. If details are unknown, they should be clearly marked as such.
6) Plumbing
- Pantry and washroom connections were planned
- Any service counter needs
7) Joinery and furniture
- Reception, storage, pantry
- Workstations and meeting room furniture if included
- Display units (retail/showroom)
8) Finishing and handover readiness
- Final paint
- Hardware installation
- Cleaning and readiness tasks
How to keep cost control strong
Two things matter:
- Make sure the scope matches the drawings
- Make sure allowances and exclusions are clearly stated
If an item is not priced, it must be visible as an exclusion. That avoids conflict later.
Output of Step 6
- Itemized scope
- Cost estimate or quote basis
- A clear baseline for approvals
Step 7: Permissions, approvals, and schedule planning
Many commercial projects slip here because teams treat approvals as a side task. It is not.
If the building needs approvals, they must be mapped early.
What happens in this step
1) Approval mapping
- What approvals are needed
- Who gives them
- What documents are required
- How long do they usually take
2) Work schedule planning
A basic execution schedule should cover:
- Start date
- Major milestones
- Material delivery windows
- Buffer for corrections
- Handover target date
3) Procurement planning
Materials have lead times. If procurement is late, execution slows.
This step identifies:
- Items that must be ordered early
- Items that need samples and approval
- Items that can be purchased later without risk
Output of Step 7
- Approval checklist
- Project schedule baseline
- Procurement plan outline
Step 8: Site execution (commercial interior fit-out)
Execution is not a single block of work. It is a sequence. A good sequence reduces rework.
Typical execution sequence
1) Site setup and marking
- Site protection
- Layout marking based on final drawings
- Verification of levels and key points
2) Partitions and base civil work
- Wall framing and partitions
- Surface preparation
- Openings for doors and service routes
3) Electrical and plumbing rough work
- Conduits and wiring routes
- Plumbing routing for pantry or service areas
- Points planned but not finished
4) Ceiling work
- Framework
- Service coordination
- Access planning
- Light cut-outs and alignment
5) Flooring
- Subfloor preparation
- Flooring installation by zone
- Transitions and edges
6) Joinery and fixed units
- Reception desk installation
- Storage and pantry units
- Display units where relevant
7) Painting and wall finishes
- Primer and finish coats
- Panels, cladding, or feature treatments if part of the scope
8) Final electrical and lighting installation
- Fixtures installed
- Testing and load checks
- Switches and plates finished
9) Final detailing
- Hardware checks
- Glass alignment (if used)
- Sealing and cleaning details
Site coordination points that keep work clean
- Weekly checks against drawings
- Material checks against approved samples
- Quick decision handling when site conditions differ
- Clear change tracking so the scope stays controlled
Output of Step 8
- Completed interior works as per drawings
- A space ready for quality checks
Step 9: Quality check, snag list, and corrections
This stage decides whether the project feels “finished” or “almost done.”
A snag list is a structured punch list of corrections.
What gets checked
1) Finishes
- Paint finish consistency
- Flooring alignment
- Wall edges and joints
- Ceiling finish and alignment
2) Doors and hardware
- Smooth opening and closing
- Locks functioning
- Handles and hinges aligned
3) Lighting and electrical
- All lights working
- No flicker or mismatch
- Points placed as per drawings
- Switch logic makes sense for daily use
4) Furniture and joinery
- Alignment
- Drawer movement and shutter finish
- Edge banding and corners
- Stability and leveling
5) Cleaning and readiness
- Dust removal
- Surface clean
- No leftover adhesives or marks
Output of Step 9
- Snag list
- Corrections completed
- A ready space for handover
Step 10: Handover and move-in readiness
Handover should mean the space is ready to use, not just “work is over.”
What a proper handover includes
- Final walkthrough
- Confirmation of agreed scope completion
- Final cleaning
- Keys and access arrangements, where applicable
- Basic operating guidance for installed elements, if needed
If a move-in is planned, it should be coordinated so that furniture placement and team movement do not damage new finishes.
Common reasons commercial interior projects break down
These issues occur across office, retail, hospitality, healthcare, and mixed-use interiors.
- The layout is approved before the real requirements are clear
- Drawings not detailed enough, leading to site guesses
- Materials were selected late, delaying procurement
- Scope unclear, causing budget movement
- Too many changes during execution without tracking
- No proper snag list and correction time planned
A structured process reduces these risks.
Key takeaways
- A commercial interior project succeeds when planning, drawings, scope, and execution follow a clear sequence.
- The brief stage prevents wrong layouts and wrong priorities.
- Site survey clarity prevents the development of design ideas that cannot be executed.
- Space planning and zoning protect the flow of movement, privacy, and daily function.
- Detailed drawings reduce confusion and rework during fit-out.
- Clear scope and pricing protect budget control.
- Procurement planning protects the timeline.
- Quality checks and snag resolution protect the outcome.
Wrapping Up
A commercial interior should support real work and real use from day one. That happens when decisions are made in the right order and documented clearly before site work begins.
If you are planning a commercial interior project and want a process that stays controlled from early planning to final handover, start with clear zoning, detailed drawings, and disciplined execution sequencing.
Connect with Trimit Rachana to plan a commercial interior project with clear steps, a stable scope, and a smooth handover.
Frequently Asked Questions (FAQs)
1. What is the commercial interior design process?
The commercial interior design process is a step-by-step workflow that includes requirement gathering, site study, space planning, concept design, detailed drawings, cost planning, approvals, execution, quality checks, and final handover.
2. How long does a commercial interior design and fit-out project take?
Project timelines vary based on space size, scope, approvals, and execution complexity. Small commercial interiors may take a few weeks, while larger office or mixed-use interiors can take several months from planning to handover.
3. What is the difference between commercial interior design and commercial interior fit-out?
Commercial interior design focuses on planning, layouts, drawings, and specifications. Commercial interior fit-out includes on-site execution such as partitions, flooring, ceilings, electrical work, joinery, and final finishes.
4. Why is space planning important in commercial interiors?
Space planning ensures proper zoning, flow of movement, privacy control, and daily usability. Poor space planning leads to operational issues, crowding, noise, and inefficient use of commercial space.
5. When should cost estimation happen in the interior design process?
Accurate cost estimation should happen after detailed drawings are prepared. At this stage, quantities, materials, and scope can be clearly defined, helping prevent budget changes during execution.
6. What approvals are required for commercial interior projects?
Approval requirements depend on the building and location. They may include permissions for layout changes, electrical load changes, fire safety systems, and HVAC modifications. These should be identified before site work begins.
7. What causes delays in commercial interior projects?
Common causes include incomplete drawings, late material selection, delayed approvals, unclear scope, frequent design changes during execution, and poor coordination between on-site systems.
8. How does a structured interior design process help control cost?
A structured process reduces assumptions, defines scope early, aligns systems before execution, and manages changes clearly. This prevents rework, timeline delays, and unplanned cost increases.


